
Kia Rio: Body (Interior and Exterior) / Interior Trim
Components and components location
| Components |
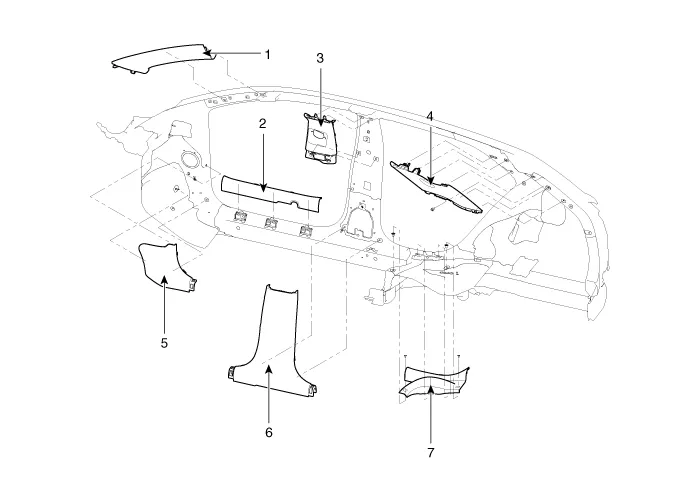
| 1. Front pillar trim assembly
2. Front door scuff trim assembly 3. Center pillar upper trim assembly 4. Rear pillar trim assembly |
5. Cowl side trim assembly
6. Center pillar lower trim assembly 7. Rear door scuff trim assembly |
- Door Scuff Trim
- Cowl Side Trim
- Front Pillar Trim
- Center Pillar Trim
- Rear Transverse Trim
- Luggage Side Trim
- Rear Pillar Trim
- Rear Wheel House Trim
- Rear Package Tray Trim
Components and components location Component Location 1. Hood lower latch assembly Repair procedures Replacement 1.
Components and components location Component Location 1. Front door scuff trim 2. Rear door scuff trim Repair procedures Replacement Put on gloves to protect your hands.
Other information:
Kia Rio 2017-2023 YB Service Manual: Turn Signal Lamp
Repair procedures Removal Door Mirror Turn Signal Lamp 1. Disconnect the negative (-) battery terminal. 2. Remove the mirror (A) from the mirror holder. Be careful not to damag
Kia Rio 2017-2023 YB Service Manual: PTC Heater
Description and operation Description The PTC (Positive Temperature Coefficient) heater is installed at the exit or the backside of heater core. The PTC heater is an electric heater using a PTC element as an auxiliary heating device that supplements deficiency of interior heat source in highly effective diesel engine.
Categories
- Manuals Home
- Kia Rio Owners Manual
- Kia Rio Service Manual
- Motor Driven Power Steering
- Cooling System
- Engine Oil and Filter
- New on site
- Most important about car
