Kia Rio: AVN System / Speaker
Repair procedures
| Inspection |
| Troubleshooting of the speakers |
When handling the speakers :
|

| 1. |
Basic inspection Loosen the screws to rule out the interference from the body trims and surrounding parts and then remove the speaker. After removing the speaker, check the sound quality of the speaker with the connector plugged in. |
| 2. |
Inspection for each cause
|


| Removal |
Front Door Speaker
| 1. |
Disconnect the negative (-) battery terminal. |
| 2. |
Remove the front door trim. (Refer to Body - "Front Door Trim") |
| 3. |
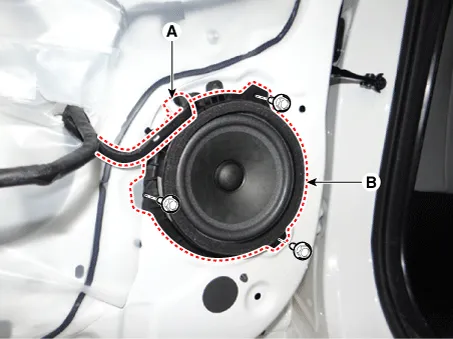
Remove the front door speaker (B) after disconnecting the connector (A) and loosening the bolts.
|
Tweeter Speaker
| 1. |
Disconnect the negative (-) battery terminal. |
| 2. |
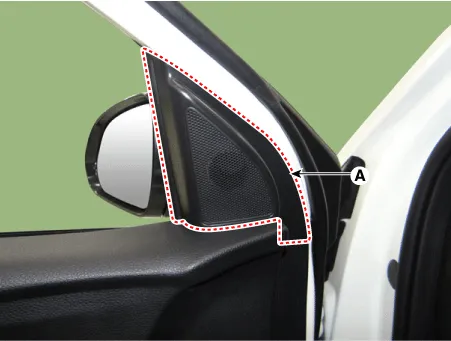
Using a screwdriver or remover, remove the front door quadrant inner cover (A).
|
| 3. |
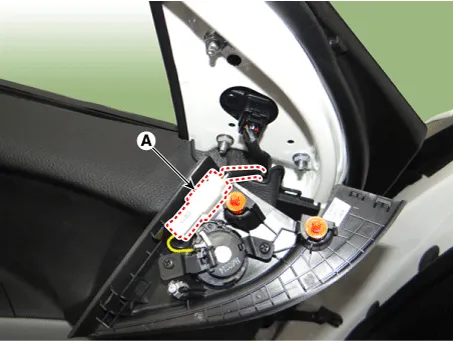
Disconnect the tweeter speaker connector (A).
|
| 4. |
Remove the tweeter speaker (A) after loosening the mounting screws.
|

Rear Door Speaker
| 1. |
Disconnect the negative (-) battery terminal. |
| 2. |
Remove the rear door trim. (Refer to Body - "Rear Door Trim") |
| 3. |
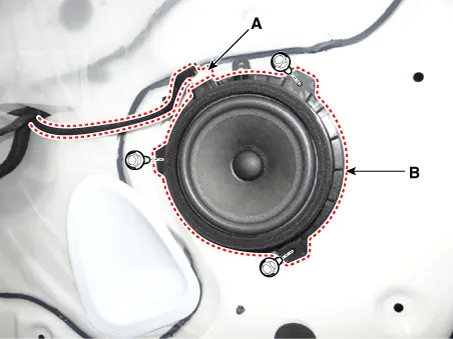
Remove the rear door speaker (B) after disconnecting the connector (A) and loosening the bolts.
|
| Installation |
Front Door Speaker
| 1. |
Install the front door speaker. |
| 2. |
Install the front door trim. |
| 3. |
Connect the negative (-) battery terminal. |
Tweeter Speaker
| 1. |
Install the tweeter speaker. |
| 2. |
Install the front door quadrant inner cover. |
| 3. |
Connect the negative (-) battery terminal. |
Rear Door Speaker
| 1. |
Install the rear door speaker. |
| 2. |
Install the rear door trim. |
| 3. |
Connect the negative (-) battery terminal. |
|
Components and components location Components Connector Pin Information No. Connector A Connector B 1 Rear door left speaker (+) - 2 Rear door left speaker (-) MIC (+) 3 - - 4 - - 5 - Antenna power 6 Camera Power Illumination (+) 7 Camera Video Multimedia-CAN (High) 8 - - 9 - ALT Left_output (-) 10 AUX Audio right_input Battery (+) 11 AUX Detect Battery (+) 12 Steering wheel remote controller Ground 13 Front door left speaker (+) Ground 14 Front door left speaker (-) MIC (Ground) 15 Front door right speaker (-) MIC (-) 16 Front door right speaker (+) - 17 - - 18 - - 19 - Illumination (-) 20 Camera Power_Ground Multimedia-CAN (Low) 21 Camera Video_Ground - 22 - ACC 23 - - 24 AUX Audio left_input - 25 AUX Audio ground Reverse 26 Steering wheel remote controller (Ground) Door open 27 Rear door right speaker (-) Door unlock_status 28 Rear door right speaker (+) Manual parking 29 - 'P' Position 30 - Auto light 31 - - 32 - - 33 Camera shield_Ground IGN1 34 - - 35 - - 36 - 37 - 38 Vehicle speed Repair procedures Removal • Be careful not to scratch the center fascia upper panel and related parts.
Components and components location Components [Roof Antenna (Radio + GPS +DAB)] Repair procedures Removal Roof antenna 1.
Other information:
Kia Rio 2017-2023 YB Service Manual: Horn
Components and components location Component Location 1. Horn switch 2. Horn relay 3. Horn 4. Clock spring Repair procedures Removal 1. Remove the front bumper assembly.
Kia Rio 2017-2023 YB Service Manual: Power Door Mirror Actuator
Components and components location Components 1. Side repeater lamp Repair procedures Inspection 1. Disconnect the negative (-) battery terminal. 2. Remove the front door quadrant inner cover (A).
Categories
- Manuals Home
- Kia Rio Owners Manual
- Kia Rio Service Manual
- General Information
- Emission Control System
- Maintenance
- New on site
- Most important about car
