Kia Rio: Fuel Delivery System / Fuel Tank
Repair procedures
| Removal |
| 1. |
Release the residual pressure in fuel line. (Refer to Delivery System - "Release Residual Pressure in Fuel Line”) |
| 2. |
Turn the ignition switch OFF and disconnect the battery negative (-) terminal. |
| 3. |
Remove the rear seat cushion. (Refer to Body - "Rear Seat Assembly") |
| 4. |
Remove the service cover (A).
|

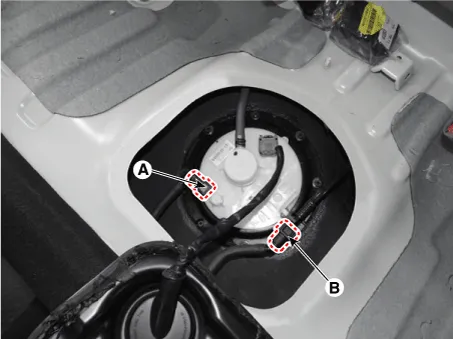
| 5. |
Disconnect the fuel pump connector (A).
|

| 6. |
Disconnect the fuel feed quick-connector (A) and the vapor tube quick-connector (B).
|
| 7. |
Lift the vehicle and support the fuel tank with a jack. |
| 8. |
Remove the center muffler assembly. (Refer to Engine Mechanical System - "Muffler") |
| 9. |
Disconnect the fuel filler hose (A), the leveling hose (B) and the vapor hose (C).
|

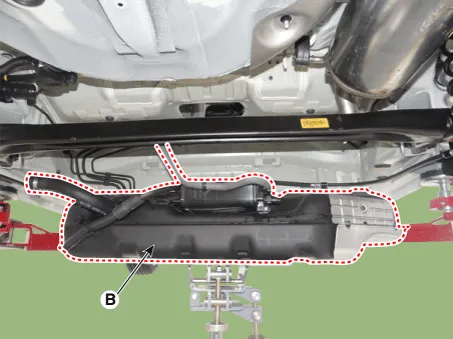
| 10. |
Remove the fuel tank mounting nuts (A), and then remove the fuel tank (B).
|

| Installation |
| 1. |
Installation is reverse of removal. |
Components and components location Components Location Fuel Tank & Filler-Neck Assembly 1. Fuel Tank 2.
Repair procedures Inspection [Fuel pump] 1. Turn ignition switch OFF and disconnect the negative (-)battery cable. 2.
Other information:
Kia Rio 2017-2023 YB Service Manual: Immobilizer System
Schematic diagrams Circuit Diaram Description and operation Description The immobilizer system will disable the vehicle unless the proper ignition key is used, in addition to the currently available anti-theft systems such as car alarms, the immobilizer system aims to drastically reduce the rate of auto theft.
Kia Rio 2017-2023 YB Service Manual: Rheostat
Components and components location Components Repair procedures Removal 1. Disconnect the negative (-) battery terminal. 2. Remove the crash pad lower panel. (Refer to Body - "Crash Pad Lower Panel") 3.
Categories
- Manuals Home
- Kia Rio Owners Manual
- Kia Rio Service Manual
- General Information
- Engine Electrical System
- Clutch System
- New on site
- Most important about car
