Kia Rio: Lighting System / Hazard Lamp Switch
Repair procedures
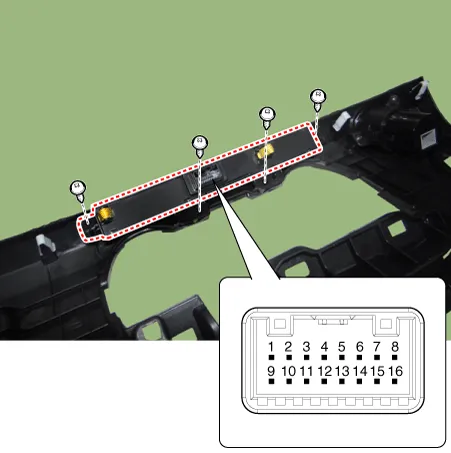
| Inspection |
| 1. |
Check for continuity between terminals. If the continuity is not as specified, replace the hazard lamp switch.
|
| Removal |
|

| 1. |
Disconnect the negative (-) battery terminal. |
| 2. |
Remove the crash pad center lower panel. (Refer to Body - "Crash Pad Center Panel") |
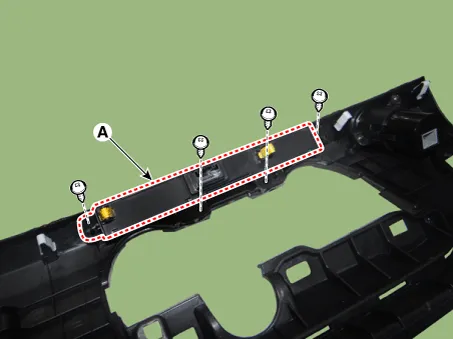
| 3. |
Remove the hazard warning lamp switch (A) after loosening the mounting screws.
|
| Installation |
| 1. |
Install the hazard warning lamp switch. |
| 2. |
Install the crash pad center lower panel. |
| 3. |
Connect the negative (-) battery terminal. |
Repair procedures Inspection 1. Remove the overhead console lamp assembly then check for continuity between terminals.
Components and components location Components Repair procedures Removal 1. Disconnect the negative (-) battery terminal.
Other information:
Kia Rio 2017-2023 YB Service Manual: Power Window Switch
Components and components location Components Driver Power Window Switch Connector Pin Information [Front / Rear Driver Safety - Auto Up/Down] [LHD] No. Description No. Description 1 Front right power window (Up) 10
Kia Rio 2017-2023 YB Service Manual: Rear Wiper/Washer
C
Categories
- Manuals Home
- Kia Rio Owners Manual
- Kia Rio Service Manual
- Maintenance
- Suspension System
- Steering System
- New on site
- Most important about car
