Kia Rio: Automatic Transaxle Control System / Shift Cable
Components and components location
| Components |

| 1. Shift lever knob & boots
2. Shift lever assembly |
3. Shift cable assembly |
Repair procedures
| Removal |
| 1. |
Place the shift lever in the "N" position. |
| 2. |
Remove the air cleaner assembly. (Refer to Engine Mechnical System - "Air Cleaner") |
| 3. |
Remove the battery and battery tray. (Refer to Engine Electrical System - "Battery") |
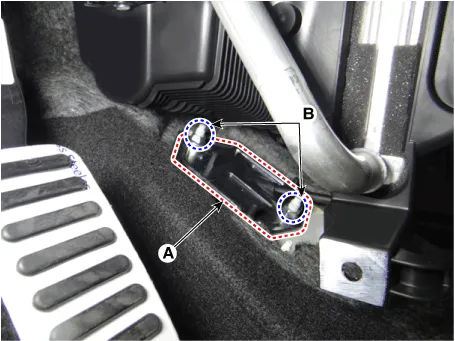
| 4. |
Remove the shift cable (B) from the bracket after loosening a nut (A).
|

| 5. |
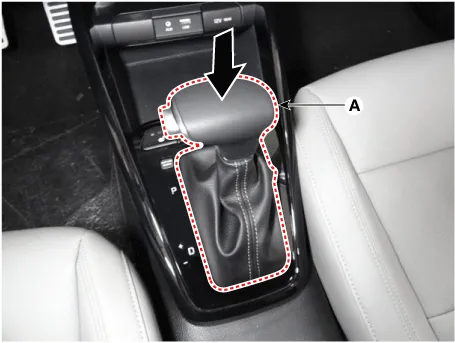
Remove the knob (A) by pulling it in the direction of arrow after removing the boots from the console upper cover.
|

| 6. |
Remove the floor console assembly. (Refer to Body - "Floor Console Assembly ") |
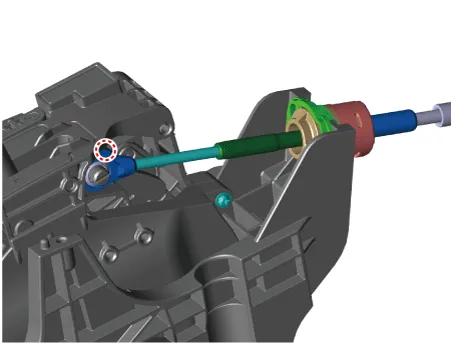
| 7. |
Remove the shift cable from the shift lever pim after removing the snap pin (A).
|

| 8. |
Remove the cable socket (A) from the shift lever.
|

| 9. |
Remove the shift cable retainer (A) after loosening the nuts (B). Then, remove the shift cable by pulling it toward the vehicle interior.
|
| Installation |
| 1. |
Check that the shift lever is placed in the "N" position. |
| 2. |
Install the shift cable retainer (A) by tightening nuts (B).
|
| 3. |
Install the cable socket (A).
|

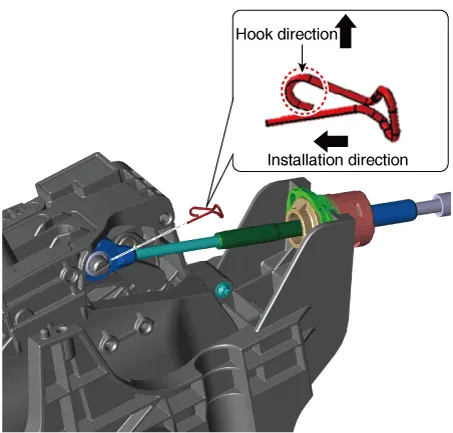
| 4. |
Install the shift cable to the lever pin and then insert the snap pin (A).
|

| 5. |
Install the floor console assembly. (Refer to Body - "Floor Console Assembly") |
| 6. |
Install the knob (A) by pressing it in the direction of arrow after installing the boots to the console upper cover.
|
| 7. |
Tighten the nut (A) to the specified torque after removing free play by pushing the shift cable (B) in the direction of the arrow.
|

| 8. |
Install the battery and battery tray. (Refer to Engine Electrical System - "Battery") |
| 9. |
Install the air cleaner assembly. (Refer to Engine Mechnical System - "Air Cleaner") |
Components and components location Components 1. Shift lever knob & boots 2. Shift lever assembly 3. Shift cable assembly Repair procedures Removal 1.
Repair procedures Repair procedures Torque Converter Stall Test This test measures the maximum engine speed when the select lever is at the "D" or "R" position and the torque converter stalls to test the operation of the torque converter, starter motor and one-way clutch operation and the holding performance of the clutches and brakes in the transmission.
Other information:
Kia Rio 2017-2023 YB Service Manual: Power Door Mirror Actuator
Components and components location Components 1. Side repeater lamp Repair procedures Inspection 1. Disconnect the negative (-) battery terminal. 2. Remove the front door quadrant inner cover (A).
Kia Rio 2017-2023 YB Service Manual: Windshield Wiper/Washer
Components and components location Component Location 1. Windshield wiper arm & blade 2. Wiper & washer switch 3. Windshield washer hose & nozzle 4. Wiper motor & linkage assembly 5. Washer motor 6.
Categories
- Manuals Home
- Kia Rio Owners Manual
- Kia Rio Service Manual
- Timing Chain
- Suspension System
- Cooling System
- New on site
- Most important about car
