Kia Rio: Body (Interior and Exterior) / Floor Carpet
Repair procedures
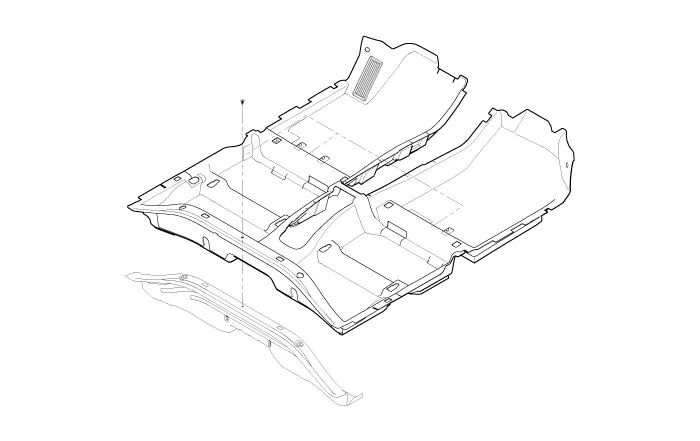
| Replacement |
Put on gloves to protect your hands. |

|

| 1. |
Remove the console front complete assembly. (Refer to Floor Console - "Floor Console Assembly") |
| 2. |
Remove the accelerator pedal. (Refer to Engine Control System - "Accelerator Position Sensor (APS)") |
| 3. |
Remove the front seat assembly. (Refer to Front Seat - "Front Seat Assembly") |
| 4. |
Remove the rear seat assembly. (Refer to Rear Seat - "Rear Seat Assembly") |
| 5. |
Remove the cowl side trim. (Refer to Interior Trim - "Cowl Side Trim") |
| 6. |
Remove the center pillar lower trim. (Refer to Interior Trim - "Center Pillar Trim") |
| 7. |
Remove the luggage side trim. (Refer to Interior Trim - "Luggage Side Trim") |
| 8. |
Remove the floor carpet assembly (A). |
| 9. |
Install in the reverse order of removal.
|
Components and components location Component Location 1. Fender assembly Repair procedures Replacement • Be careful not to damage the fender and body.
Components and components location Components [DLX] 1. Floor console assembly 2. Rear console cover 3. Console armrest 4.
Other information:
Kia Rio 2017-2023 YB Service Manual: Indicators And Gauges
Troubleshooting Troubleshooting Error Item Failure symptom Inspection items Detailed inspections Relevant Parts/ Components Screen display LCD screen does not turn on 1) Connector attachments
Kia Rio 2017-2023 YB Service Manual: Photo Sensor (FATC only)
Description and operation Description The photo sensor is located at the center of defrost nozzles. The photo sensor contains a photovoltaic (sensitive to sunlight) diode. The solar radiation received by its light receiving portion, generates an electromotive force in proportion to the amount of radiation received which is tran
Categories
- Manuals Home
- Kia Rio Owners Manual
- Kia Rio Service Manual
- Maintenance
- Steering System
- Emission Control System
- New on site
- Most important about car
