
Kia Rio: Blower / Blower Motor
Repair procedures
| Inspection |
| 1. |
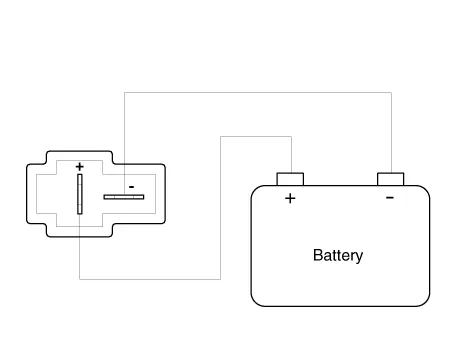
Connect the battery voltage and check the blower motor rotation.
|
| 2. |
If the blower motor does not operate well, substitute with a known-good blower motor and check for proper operation. |
| 3. |
If the problem is corrected, replace the blower motor. |
| Replacement |
| 1. |
Disconnect the negative (-) battery terminal. |
| 2. |
Remove the crash pad and heater & blower unit assembly. (Refer to HA group – “Heater Unit”) |
| 3. |
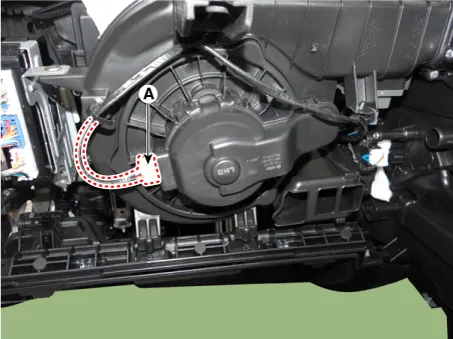
Disconnect the blower motor connector (A).
|
| 4. |
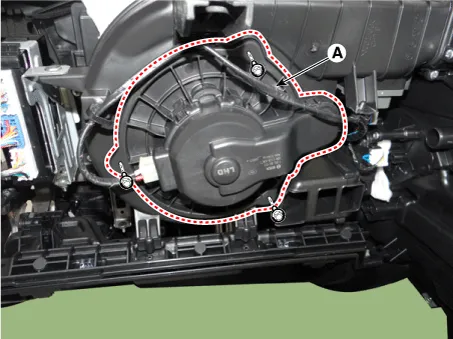
Remove the blower motor (A) after loosening the screws.
|
| 5. |
Installation is the reverse order of removal. |
Components and components location Component Location Components 1. Intake actuator 2. Air filter 3.
Repair procedures Inspection 1. Measure the resistance between the terminals. 2. The measured resistance is not within specification, the blower resistor must be replaced.
Other information:
Kia Rio 2017-2023 YB Service Manual: Compressor Oil
Repair procedures Oil Specification 1. The HFC-134a system requires synthetic compressor oil (PAG) whereas the R-12 system requires mineral compressor oil. The two oils must never be mixed. 2. Compressor oil (PAG) varies according to compressor model.
Kia Rio 2017-2023 YB Service Manual: Evaporator Temperature Sensor
Description and operation Description The evaporator temperature sensor will detect the evaporator core temperature and interrupt compressor relay power in order to prevent evaporator freezing by excessive cooling. Repair procedures Inspection 1.
Categories
- Manuals Home
- Kia Rio Owners Manual
- Kia Rio Service Manual
- Motor Driven Power Steering
- Engine Mechanical System
- CVVT & Camshaft
- New on site
- Most important about car
