Kia Rio: Charging System / Battery Sensor
Description and operation
| Description |
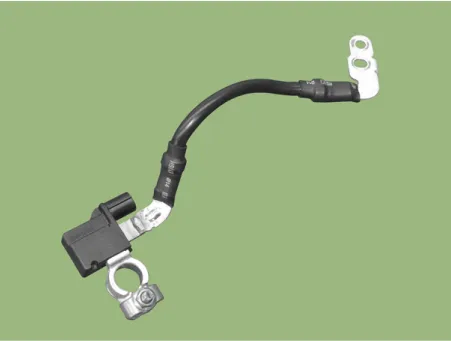
Vehicles have many control units that use more electricity. These units control their own system based on information from diverse sensors. It is important to have a stable power supply as there diverse sensors giving a variety of information. Battery sensor (A) is mounted on battery (-) terminal. It transmits battery voltage, current, temperature information to ECM. ECM controls generating voltage by duty cycle based on these signals.
Repair procedures
| Removal |
| 1. |
Turn the ignition switch OFF. |
| 2. |
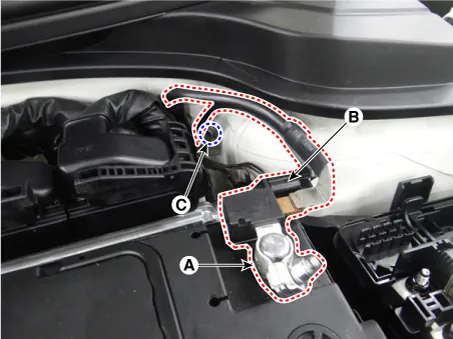
Disconnect the battery negative (-) terminal (A). |
| 3. |
Disconnect the battery sensor connector (B). |
| 4. |
Remove the battery sensor by loosening the mounting bolts (C).
|
| Installation |
| 1. |
Install in the reverse order of removal.
|

| Battery Sensor Recalibration Procedure |
After reconnecting the battery negative cable, AMS function does not operates until the system is stabilized, about 4 hours. If disconnecting the negative (-) battery cable from the battery during repair work for the vehicle equipped with AMS function, Battery sensor recalibration procedure should be performed after finishing the repair work.
| 1. |
Turn the Iginition switch ON and OFF. |
| 2. |
Park the vehicle for about 4 hours with the hood and all doors closed. |
Specifications Specification ▷ AGM60L-DIN Item Specification Capacity [20HR/5HR] (AH) 60/48 Cold Cranking Amperage (A) 640 (SAE) / 640(EN) Reserve Capacity (Min) 100 • Model type description • Cold Cranking Ampere (CCA): Cold Cranking Amps is a rating used in the battery industry to define a battery's ability to start an engine in cold temperatures.
Description and operation Description Ignition timing is controlled by the electronic control ignition timing system. The standard reference ignition timing data for the engine operating conditions are pre-pro grammed in the memory of the ECM (Engine Control Module).
Other information:
Kia Rio 2017-2023 YB Service Manual: Vanity Lamp
Repair procedures Removal 1. Disconnect the negative (-) battery terminal. 2. Detach the vanity lamp (A) using a flat-tip screwdriver. 3. Disconnect the vanity lamp connector (A).
Kia Rio 2017-2023 YB Service Manual: Front Fog Lamps
Repair procedures Removal 1. Disconnect the negative (-) battery terminal. 2. Remove the front bumper assembly. (Refer to Body - "Front Bumper Assembly") 3. Remove the front fog lamp assembly (A) after loosening the mounting screws.
Categories
- Manuals Home
- Kia Rio Owners Manual
- Kia Rio Service Manual
- Body (Interior and Exterior)
- Coolant
- Motor Driven Power Steering
- New on site
- Most important about car
