Kia Rio: Audio / Audio Unit
Components and components location
| Components |
| [Radio/MP3 (A Type)] |
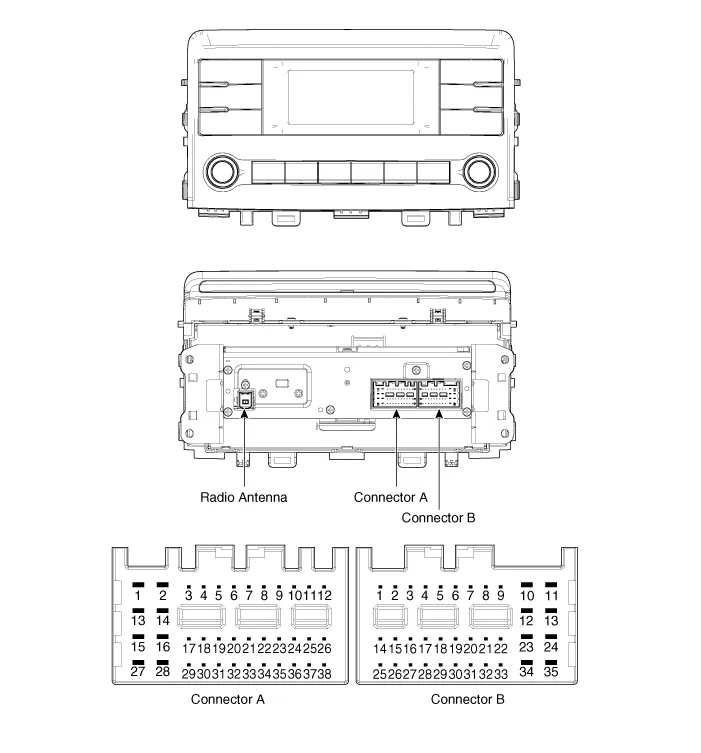
Connector Pin Information
|
No. |
Connector A |
Connector B |
|
1 |
Rear door left speaker (+) |
- |
|
2 |
Rear door left speaker (-) |
MIC (+) |
|
3 |
USB Ground |
- |
|
4 |
USB D (+) |
Detent |
|
5 |
USB D (-) |
Remote antenna |
|
6 |
USB Power |
Illumination (+) |
|
7 |
- |
- |
|
8 |
- |
- |
|
9 |
- |
- |
|
10 |
AUX Right input |
Battery (+) |
|
11 |
AUX Detect |
Battery (+) |
|
12 |
Steering wheel remote controller |
Ground |
|
13 |
Front door left speaker (+) |
Ground |
|
14 |
Front door left speaker (-) |
- |
|
15 |
Front door right speaker (-) |
MIC (-) |
|
16 |
Front door right speaker (+) |
- |
|
17 |
- |
- |
|
18 |
- |
Vehicle speed |
|
19 |
- |
Illumination (-) |
|
20 |
- |
- |
|
21 |
- |
- |
|
22 |
- |
ACC |
|
23 |
- |
- |
|
24 |
AUX Left input |
- |
|
25 |
AUX Ground |
Reverse |
|
26 |
Steering wheel remote controller (Ground) |
- |
|
27 |
Rear door right speaker (-) |
- |
|
28 |
Rear door right speaker (+) |
- |
|
29 |
- |
- |
|
30 |
- |
- |
|
31 |
- |
- |
|
32 |
- |
- |
|
33 |
- |
- |
|
34 |
- |
- |
|
35 |
- |
- |
|
36 |
- |
|
|
37 |
- |
|
|
38 |
- |
| [Radio/MP3/Bluetooth (B Type)] |
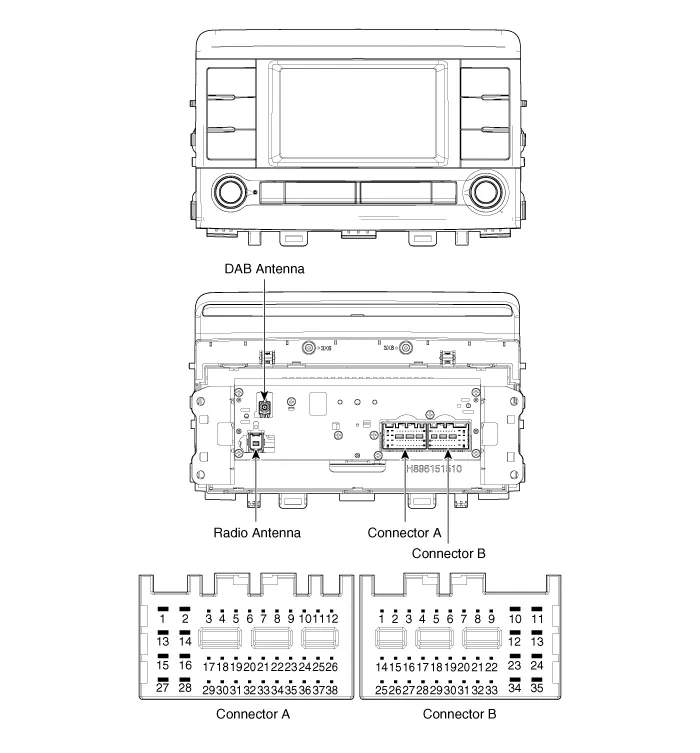
Connector Pin Information
|
No. |
Connector A |
Connector B |
|
1 |
Rear door left speaker (+) |
- |
|
2 |
Rear door left speaker (-) |
MIC (+) |
|
3 |
USB Ground |
- |
|
4 |
USB D (+) |
- |
|
5 |
USB D (-) |
Remote antenna |
|
6 |
USB Power |
Illumination (+) |
|
7 |
Camera VIN |
- |
|
8 |
- |
- |
|
9 |
- |
- |
|
10 |
AUX Right input |
Battery (+) |
|
11 |
AUX Detect |
Battery (+) |
|
12 |
Steering wheel remote controller |
Ground |
|
13 |
Front door left speaker (+) |
Ground |
|
14 |
Front door left speaker (-) |
- |
|
15 |
Front door right speaker (-) |
MIC (-) |
|
16 |
Front door right speaker (+) |
- |
|
17 |
- |
- |
|
18 |
- |
Vehicle speed |
|
19 |
- |
Illumination (-) |
|
20 |
Camera Power |
- |
|
21 |
Camera VIN Ground |
- |
|
22 |
- |
ACC |
|
23 |
- |
- |
|
24 |
AUX Left input |
- |
|
25 |
AUX Ground |
- |
|
26 |
Steering wheel remote controller (Ground) |
Door open |
|
27 |
Rear door right speaker (-) |
- |
|
28 |
Rear door right speaker (+) |
Parking brake |
|
29 |
- |
'P' Position |
|
30 |
- |
Auto light |
|
31 |
- |
- |
|
32 |
Camera Ground |
IGN1 |
|
33 |
Camera VIN Shield |
- |
|
34 |
- |
- |
|
35 |
- |
- |
|
36 |
Camera Detect |
|
|
37 |
- |
|
|
38 |
- |

Repair procedures
| Removal |
|

| 1. |
Disconnect the negative (-) battery terminal. |
| 2. |
Remove the center fascia duct assembly. (Refer to Body - "Center Fascia Panel") |
| 3. |
Remove the audio head unit (A) after loosening the mounting screws.
|
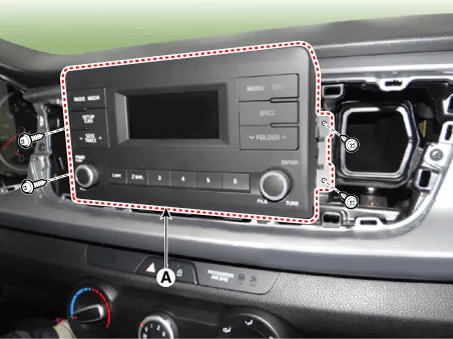
| 4. |
Remove the audio head unit after disconnecting the connectors and antenna cable (A).
|

| Installation |
| 1. |
Connect the audio head unit connectors and antenna cable. |
| 2. |
Install the audio head unit. |
| 3. |
Install the center fascia duct assembly. |
| 4. |
Connect the negative (-) battery terminal.
|

Specifications Specifications Items Specifications Model Radio/MP3 (A Type) Radio/MP3/Bluetooth (B Type) Power supply DC 14.
Repair procedures Inspection Troubleshooting of the speakers When handling the speakers : • Do not cause shock to the speakers by dropping or throwing them.
Other information:
Kia Rio 2017-2023 YB Service Manual: Sunroof
C
Kia Rio 2017-2023 YB Service Manual: Heater Unit
Components and components location Component Location Components 1. Heater pipe cover 2. Heater core 3. Mode control actuator 4. Mode control actuator bracket 5. Mode control main lever 6.
Categories
- Manuals Home
- Kia Rio Owners Manual
- Kia Rio Service Manual
- Cooling System
- Clutch System
- Brake System
- New on site
- Most important about car
