Kia Rio: Power Windows / Power Window Switch
Components and components location
| Components |
| Driver Power Window Switch |
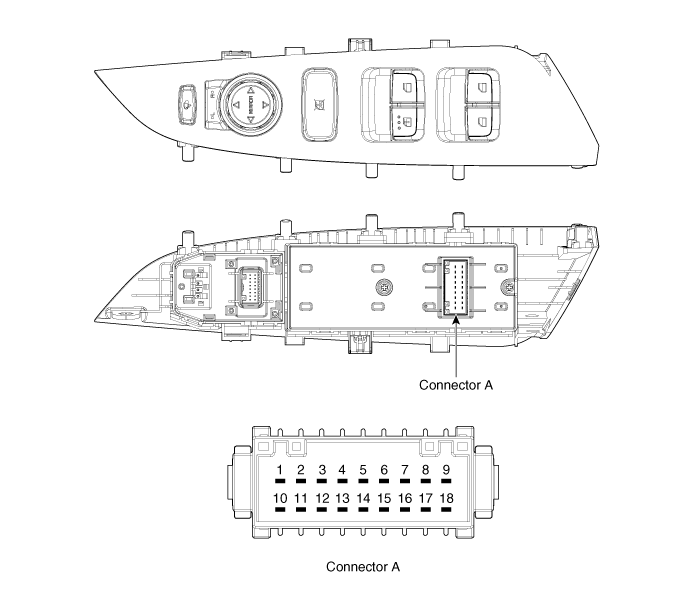
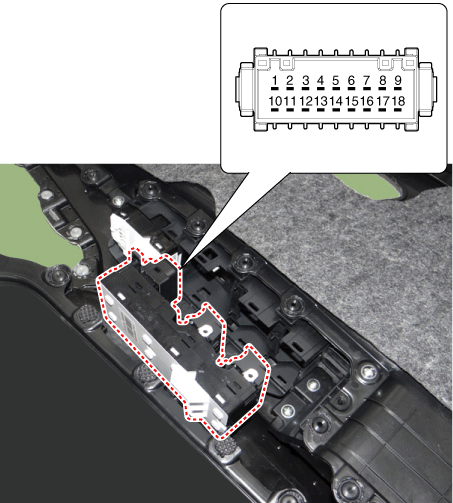
Connector Pin Information
[Front / Rear Driver Safety - Auto Up/Down]
[LHD]
|
No. |
Description |
No. |
Description |
|
1 |
Front right power window (Up) |
10 |
Rear right power window (Up) |
|
2 |
- |
11 |
Rear right power window (Down) |
|
3 |
Front right power window (Down) |
12 |
Battery (+)_RH |
|
4 |
- |
13 |
Tail lamp |
|
5 |
Left window lock switch |
14 |
Right window lock switch |
|
6 |
Driver main power window (Up/Down) |
15 |
Rear left power window (Up) |
|
7 |
- |
16 |
Rear left power window (Down) |
|
8 |
Ground |
17 |
- |
|
9 |
- |
18 |
Battery (+)_LH |
[RHD]
|
No. |
Description |
No. |
Description |
|
1 |
- |
10 |
Rear right power window (Up) |
|
2 |
- |
11 |
Rear right power window (Down) |
|
3 |
- |
12 |
Battery (+)_RH |
|
4 |
- |
13 |
Tail lamp |
|
5 |
Left window lock switch |
14 |
Right window lock switch |
|
6 |
Driver main power window (Up/Down) |
15 |
Rear left power window (Up) |
|
7 |
Front left power window (Up) |
16 |
Rear left power window (Down) |
|
8 |
Ground |
17 |
- |
|
9 |
Front left power window (Down) |
18 |
Battery (+)_LH |
[Front Driver Safety - Auto Up/Down]
[LHD]
|
No. |
Description |
No. |
Description |
|
1 |
Front right power window (Up) |
10 |
- |
|
2 |
- |
11 |
- |
|
3 |
Front right power window (Down) |
12 |
Battery (+)_RH |
|
4 |
- |
13 |
Tail lamp |
|
5 |
- |
14 |
- |
|
6 |
Driver main power window (Up/Down) |
15 |
- |
|
7 |
- |
16 |
- |
|
8 |
Ground |
17 |
- |
|
9 |
- |
18 |
- |
[RHD]
|
No. |
Description |
No. |
Description |
|
1 |
- |
10 |
- |
|
2 |
- |
11 |
- |
|
3 |
- |
12 |
- |
|
4 |
- |
13 |
Tail lamp |
|
5 |
- |
14 |
- |
|
6 |
Driver main power window (Up/Down) |
15 |
- |
|
7 |
Front left power window (Up) |
16 |
- |
|
8 |
Ground |
17 |
- |
|
9 |
Front left power window (Down) |
18 |
Battery (+)_LH |
[Front / Rear Auto Down]
[LHD]
|
No. |
Description |
No. |
Description |
|
1 |
Front right power window (Up) |
10 |
Rear right power window (Up) |
|
2 |
- |
11 |
Rear right power window (Down) |
|
3 |
Front right power window (Down) |
12 |
Battery (+)_RH |
|
4 |
- |
13 |
Tail lamp |
|
5 |
Left window lock switch |
14 |
Right window lock switch |
|
6 |
- |
15 |
Rear left power window (Up) |
|
7 |
Front left power window (Up) |
16 |
Rear left power window (Down) |
|
8 |
Ground |
17 |
- |
|
9 |
Front left power window (Down) |
18 |
Battery (+)_LH |
[RHD]
|
No. |
Description |
No. |
Description |
|
1 |
Front right power window (Up) |
10 |
Rear right power window (Up) |
|
2 |
- |
11 |
Rear right power window (Down) |
|
3 |
Front right power window (Down) |
12 |
Battery (+)_RH |
|
4 |
- |
13 |
Tail lamp |
|
5 |
Left window lock switch |
14 |
Right window lock switch |
|
6 |
- |
15 |
Rear left power window (Up) |
|
7 |
Front left power window (Up) |
16 |
Rear left power window (Down) |
|
8 |
Ground |
17 |
- |
|
9 |
Front left power window (Down) |
18 |
Battery (+)_LH |
[Front Auto Down]
[LHD]
|
No. |
Description |
No. |
Description |
|
1 |
Front right power window (Up) |
10 |
- |
|
2 |
- |
11 |
- |
|
3 |
Front right power window (Down) |
12 |
Battery (+)_RH |
|
4 |
- |
13 |
Tail lamp |
|
5 |
- |
14 |
- |
|
6 |
- |
15 |
- |
|
7 |
Front left power window (Up) |
16 |
- |
|
8 |
Ground |
17 |
- |
|
9 |
Front left power window (Down) |
18 |
Battery (+)_LH |
[RHD]
|
No. |
Description |
No. |
Description |
|
1 |
Front right power window (Up) |
10 |
- |
|
2 |
- |
11 |
- |
|
3 |
Front right power window (Down) |
12 |
Battery (+)_RH |
|
4 |
- |
13 |
Tail lamp |
|
5 |
- |
14 |
- |
|
6 |
- |
15 |
- |
|
7 |
Front left power window (Up) |
16 |
- |
|
8 |
Ground |
17 |
- |
|
9 |
Front left power window (Down) |
18 |
Battery (+)_LH |
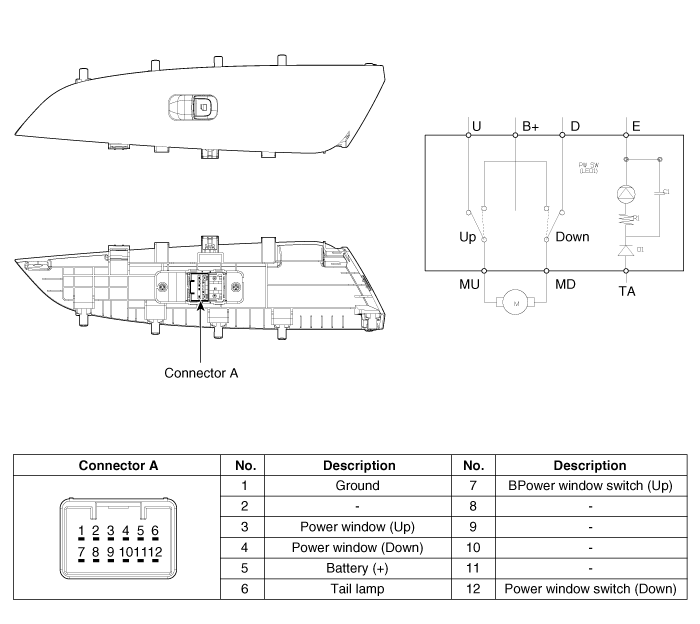
| Assist Power Window Switch |
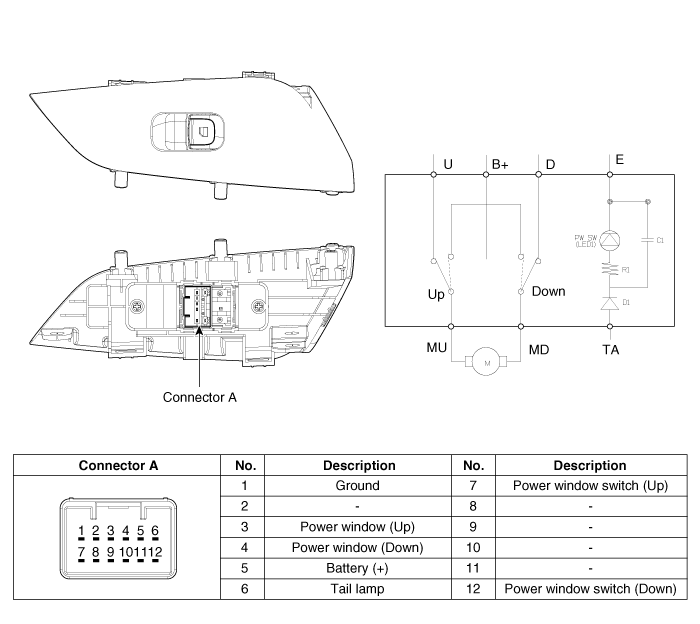
| Rear Power Window Switch |
Repair procedures
| Removal |
|

Driver Power Window Switch
| 1. |
Disconnect the negative (-) battery terminal. |
| 2. |
Remove the front left door trim. (Refer to Body - "Front Door Trim") |
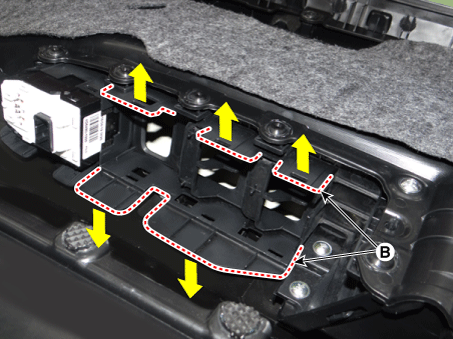
| 3. |
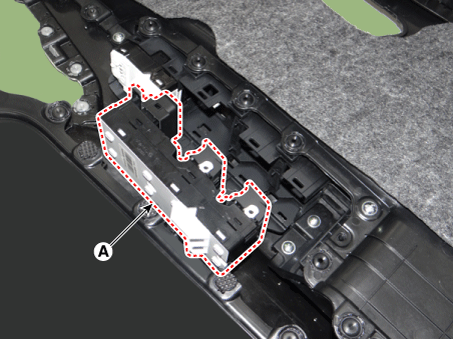
Remove the power window switch assembly (A) by pulling out both ends of the switch holders (B).
|
Assist Power Window Switch
| 1. |
Disconnect the negative (-) battery terminal. |
| 2. |
Remove the front right door trim. (Refer to Body - "Front Door Trim") |
| 3. |
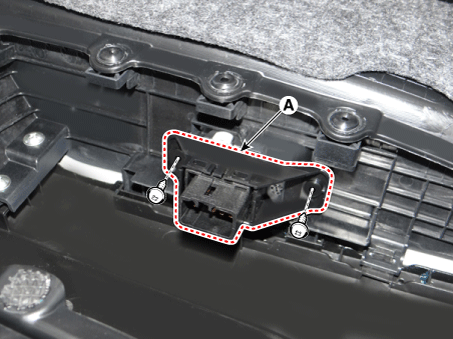
Remove the power window switch assembly (A) after loosening the mounting screws.
|
Rear Power Window Switch
| 1. |
Disconnect the negative (-) battery terminal. |
| 2. |
Remove the rear door trim. (Refer to Body - "Rear Door Trim") |
| 3. |
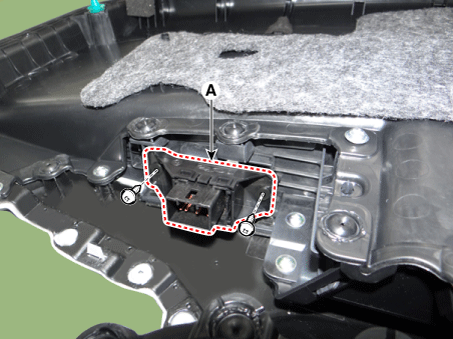
Remove the power window switch assembly (A) after loosening the mounting screws.
|
| Installation |
Driver Power Window Switch
| 1. |
Install the driver power window switch. |
| 2. |
Install the front door trim after connecting the connector. |
| 3. |
Connect the negative (-) battery terminal. |
Assist Power Window Switch
| 1. |
Install the assist power window switch. |
| 2. |
Install the front door trim after connecting the connector. |
| 3. |
Connect the negative (-) battery terminal. |
Rear Power Window Switch
| 1. |
Install the rear power window switch. |
| 2. |
Install the rear door trim after connecting the connector. |
| 3. |
Connect the negative (-) battery terminal. |
| Inspection |
Driver Power Window Switch
| 1. |
Disconnect the negative (-) battery terminal. |
| 2. |
Remove the front left door trim. |
| 3. |
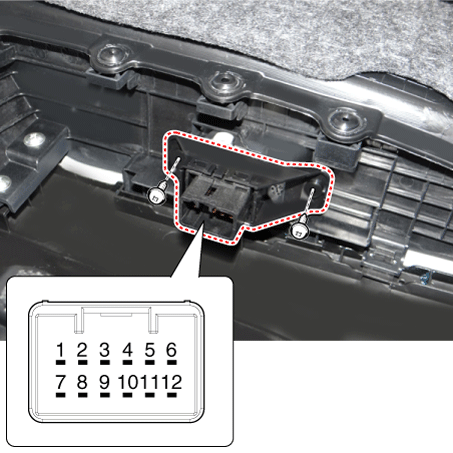
Disconnect the power window switch connector from the door trim.
|
| 4. |
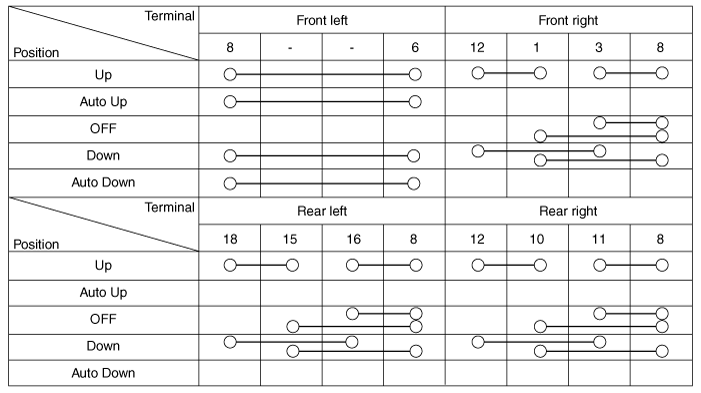
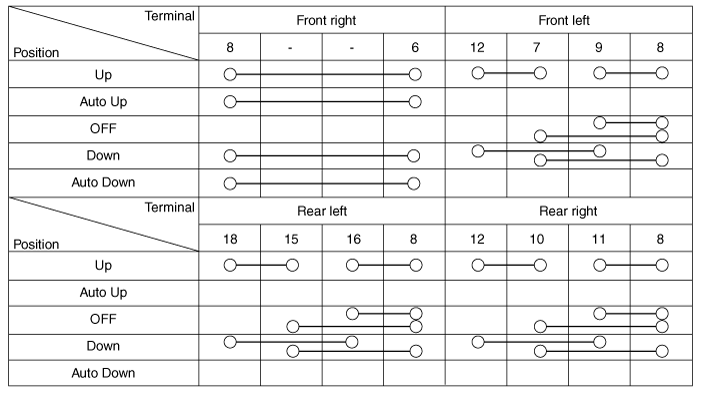
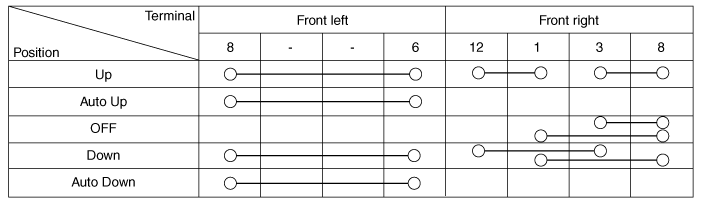
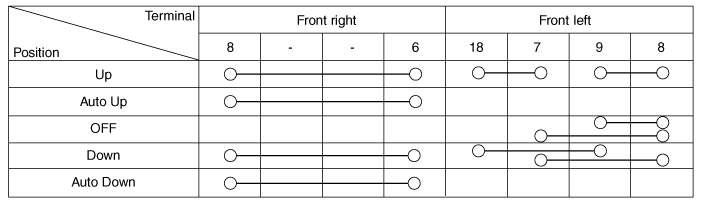
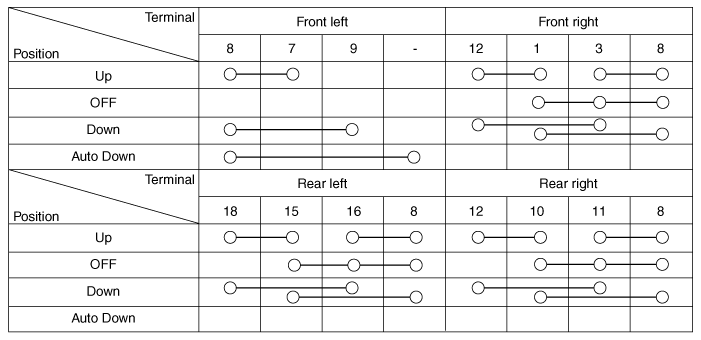
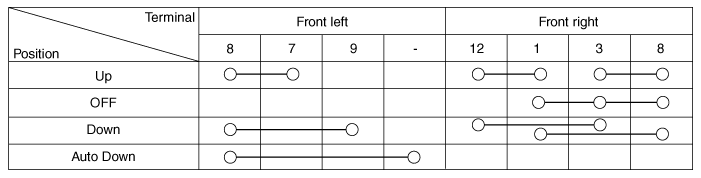
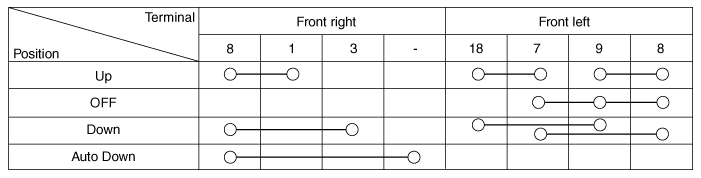
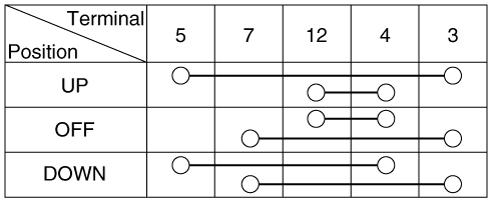
Check for continuity between the terminals in each switch position according to the table. If the continuity condition is not normal, replace the switch. [Front / Rear Driver Safety - Auto Up/Down] (LHD)
(RHD)
[Front Driver Safety - Auto Up/Down] (LHD)
(RHD)
[Front / Rear Auto Down] (LHD)
(RHD)
[Front Auto Down] (LHD)
(RHD)
|

Assist / Rear Power Window Switch
| 1. |
Disconnect the negative (-) battery terminal. |
| 2. |
Remove the front right door trim. (Refer to Body - "Front Door Trim") (Refer to Body - "Rear Door Trim") |
| 3. |
Disconnect the power window switch connector from the door trim. [Assist power window switch]
[Rear Power Window Switch]
|

| 4. |
Check for continuity between the terminals in each switch position according to the table. If the continuity condition is not normal, replace the switch.
|
Diagnosis With KDS/GDS
| 1. |
The body electrical system can be quickly diagnosed for failed parts by using vehicle diagnostic system (KDS/GDS). The diagnostic system (KDS/GDS) provides the following information.
|
| 2. |
Select the 'Car model' and the system to be checked in order to check the vehicle with the tester. |
| 3. |
Select the 'Body Control Module (BCM)' to check the Body Control Module (BCM). |
| 4. |
Select the "Current Data" menu to search the current state of the input/output data. The input/output data for the sensors corresponding to the door lock switch can be checked.
|
| 5. |
If you will check the power door lock operation forcefully, select "Actuation test" of BCM.
|

 Power Window Motor
Components and components location
Components
[Standard window motor]
[Safety window motor]
Repair procedures
Inspection
...
 Rear Glass Defogger
Components and components location
Component Location
1. Rear glass defogger
relay
2. Rear glass defogger switch (Manual Type)
3. Rear glass defogger
swi ...
Other information:
Kia Rio 2017-2025 YB Service Manual: Floor Carpet
Repair procedures Replacement Put on gloves to protect your hands. • Use a plastic panel removal tool to remov ...
Kia Rio 2017-2025 YB Service Manual: Towing
General information Towing If the vehicle needs to be towed, call a professional towing service. Never tow a vehicle just on a rope or chain as this is extremely dangerous. Emergency Towing There are three popular methods of towing a vehicle: – Flatbed: ...
