Kia Rio: If you have a flat tire (with Tire Mobility Kit) / Introduction
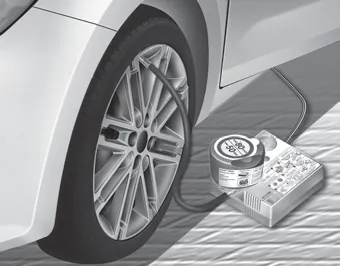
With the Tire Mobility Kit you stay mobile even after experiencing a tire puncture.
The system of compressor and sealing compound effectively and comfortably seals most punctures in a passenger car tire caused by nails or similar objects and reinflates the tire.
After you ensured that the tire is properly sealed you can drive cautiously on the tire (up to 200 km (120 miles)) at a max. speed of 80 km/h (50 mph) in order to reach a service station or tire dealer to have the tire repaired or replaced.
It is possible that some tires, especially with larger punctures or damage to the sidewall, cannot be sealed completely.
Air pressure loss in the tire may adversely affect tire performance. For this reason, you should avoid abrupt steering or other driving maneuvers, especially if the vehicle is heavily loaded or if a trailer is in use.
The Tire Mobility Kit is not designed or intended as a permanent tire repair method and is to be used for one tire only.
This instruction shows you step by step procedure to temporarily seal the puncture.
Read the section "Notes on the safe use of the Tire Mobility Kit".
■ 4 door ■ 5 door For safe operation, carefully read and follow the instructions in this manual before use. (1) Compressor (2) Sealant bottle The Tire Mobility Kit is a temporary fix to the tire and the tire should be inspected by an authorized Kia dealer as soon as possible.
Park your car at the side of the road so that you can work with the Tire Mobility Kit away from moving traffic. To be sure your vehicle will not move, even when you're on fairly level ground, always set your parking brake.
Other information:
Kia Rio 2017-2023 YB Service Manual: Rear Washer Switch
Repair procedures Inspection Multifunction Switch Inspection [BCM Type] 1. Check for continuity between the terminals in each switch position as shown below. [Left Handle Drive] Switch Switch position Switch terminal
Kia Rio 2017-2023 YB Service Manual: Compressor
Description and operation Description The compressor is the power unit of the A/C system. It is located on the side of engine block and driven by a V-belt of engine. The compressor changes the low pressure and low temperature refrigerant gas into the high pressure and high temperature refrigerant gas.
Categories
- Manuals Home
- Kia Rio Owners Manual
- Kia Rio Service Manual
- Motor Driven Power Steering
- Brake System
- Body Electrical System
- New on site
- Most important about car
