Kia Rio: Cooling System / Coolant
Repair procedures
| Replacement and air bleeding |
Never remove the radiator cap when the engine is hot. Serious scalding could be caused by hot fluid under high pressure escaping from the radiator. |

When pouring engine coolant, be sure to shut the relay box lid and not to let coolant spill on the electrical parts or the paint. If any coolant spills, rinse it off immediately. |

| 1. |
Make sure the engine and radiator are cool to the touch. |
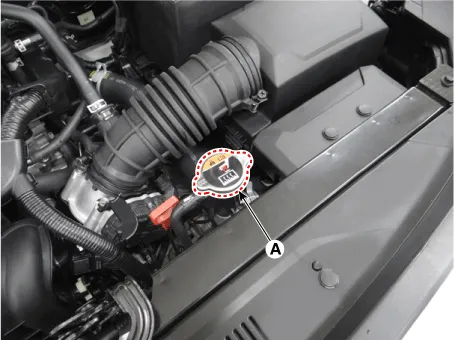
| 2. |
Remove the radiator cap (A).
|
| 3. |
Remove the engine room under. (Refer to Engine and Transaxle Assembly - "Engine Room Under Cover") |
| 4. |
Loosen the drain plug (A), and drain the coolant.
|

| 5. |
Tighten the radiator drain plug securely. |
| 6. |
After draining engine coolant in the reservoir tank, clean the tank. |
| 7. |
Fill the radiator with water through the radiator cap and tighten the cap.
|
| 8. |
Start the engine and allow to come to normal operating temperature. Wait for the cooling fans to turn on several times. Accelerate the engine to aid in purging trapped air. Shut engine off. |
| 9. |
Wait until the engine is cool. |
| 10. |
Repeat steps 1 to 8 until the drained water runs clear. |
| 11. |
Coolant and water 45 - 50% slowly through the radiator cap.
|
| 12. |
Start the engine and run until coolant circulates. When the cooling fan operates and coolant circulates, refill coolant through the radiator cap. |
| 13. |
Repeat 11 until the cooling fan 3 - 5 times and bleed air sufficiently out of the cooling system. |
| 14. |
Install the radiator cap and fill the reservoir tank to the "MAX" (or "F") line with coolant. |
| 15. |
Run the vehicle under idle until the cooling fan operates 2 - 3 times. |
| 16. |
Stop the engine and wait coolant gets cool. |
| 17. |
Repeat 10 to 15 until the coolant level doesn't fall any more, bleed air out of the cooling system.
|
| Inspection |
Radiator hoses
| 1. |
Check radiator hoses for the following:
|
Coolant level
| 1. |
Check the coolant level in the coolant reservoir. Make sure it is between the "F" mark and "L" mark. |
| 2. |
If the coolant level in the coolant reservoir is at or below the "L" mark, add coolant to bring it between the "L" and "F" marks, then inspect the cooling system for leaks. |
Coolant quality
| 1. |
Remove the radiator cap. |
| 2. |
Check if there are any excessive deposits of rust or scale around the radiator cap sub-assembly and radiator filler hole. Also, the coolant should be free of oil.If excessively dirty, clean the coolant passage and replace the coolant. |
| 3. |
Install the radiator cap. |
Components and components location Components 1. Radiator 2. Radiator upper hose 3. Radiator lower hose 4. Filler neck assembly 5.
Components and components location Components 1. Cooling fan 3. Cooling fan shroud 2. Fan motor 4. Radiator Specifications Specifications Item Specification 120W 160W 180W Fan type Puller Puller Puller Fan speed control Resistor Resistor Resistor Air flow rate [㎥/h] 1,700 - 8% min.
Other information:
Kia Rio 2017-2023 YB Service Manual: Seat Heater Switch
Components and components location Components 1. Driver side seat heater switch 2. Passenger side seat heater switch Description and operation Description Seat Heater Smart Control Technology • To prevent low temperature burn, seat heater temperature will autom
Kia Rio 2017-2023 YB Service Manual: Intake Actuator
Description and operation Description The intake actuator is located at the blower unit. It regulates the intake door by signal from control unit. Pressing the intake selection switch will shift between recirculation and fresh air modes.
Categories
- Manuals Home
- Kia Rio Owners Manual
- Kia Rio Service Manual
- Body Electrical System
- Steering System
- Suspension System
- New on site
- Most important about car
