Kia Rio: Maintenance / Engine oil
Checking the engine oil level
■ Gamma II 1.6L MPI (Gasoline engine)
1. Be sure the vehicle is on level ground.
2. Start the engine and allow it to reach normal operating temperature.
3. Turn the engine off and wait for a few minutes (about 5 minutes) for the oil to return to the oil pan.
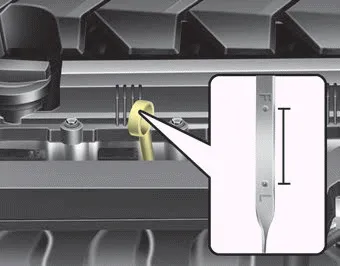
4. Pull the dipstick out, wipe it clean, and reinsert it fully.
WARNING - Radiator hose
Be very careful not to touch the radiator hose when checking or adding the engine oil as it may be hot enough to burn you.
5. Pull the dipstick out again and check the level. The level should be between F and L.
CAUTION - Replacing engine oil
Do not overfill the engine oil. It may damage the engine.
■ Gamma II 1.6L MPI (Gasoline engine)
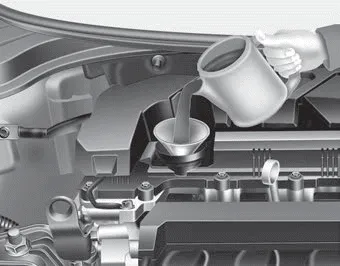
If it is near or at L, add enough oil to bring the level to F. Do not overfill.
Use a funnel to help prevent oil from being spilled on engine components.
Changing the engine oil and filter
Have engine oil and filter changed by an authorized Kia dealer according to the Maintenance Schedule at the beginning of this chapter.
WARNING - Used engine oil
Used engine oil may cause irritation or cancer of the skin if left in contact with the skin for prolonged periods of time. Always protect your skin by washing your hands thoroughly with soap and warm water as soon as possible after handling used oil.
When checking engine oil, engine coolant, brake fluid, and washer fluid, always be sure to clean the area around any filler plug, drain plug, or dipstick before checking or draining any lubricant or fluid.
The high-pressure cooling system has a reservoir filled with year round antifreeze coolant. The reservoir is filled at the factory. Check the antifreeze protection and coolant level at least once a year: at the beginning of the winter season, and before traveling to a colder climate.
Other information:
Kia Rio 2017-2023 YB Service Manual: Sunroof
C
Kia Rio 2017-2023 YB Service Manual: Front Washer Motor
Repair procedures Inspection Front Washer Motor 1. With the washer motor connected to the reservoir tank, fill the reservoir tank with water. • Before filling the reservoir tank wi
Categories
- Manuals Home
- Kia Rio Owners Manual
- Kia Rio Service Manual
- Engine Oil and Filter
- Engine Mechanical System
- General Information
- New on site
- Most important about car
